Saturday, April 30, 2011

Crockpot Cooking: Italian Style Pot Roast

One of the things I like best about using my crock pot when I'm going to be out (you know, other that having the meal pretty much ready that evening) is the smell when you open the door. This is one of those that has all the kids going, "Oh!! That smells soooo good!", and wondering how much longer it will be before they can eat. Some of the ingredients in this are interchangable with other things. I'll list the things I used this time and will let you know of the other possibilities in the photo descriptions.

Italian Style Pot Roast

Chuck roast                             12 oz. can tomato paste
1 pint diced tomatoes               stock (or water and beef base)
onions                                      carrots
zucchinni                                  salt or seasoned meat tenderizer
pepper                                     italian seasoning
olive oil

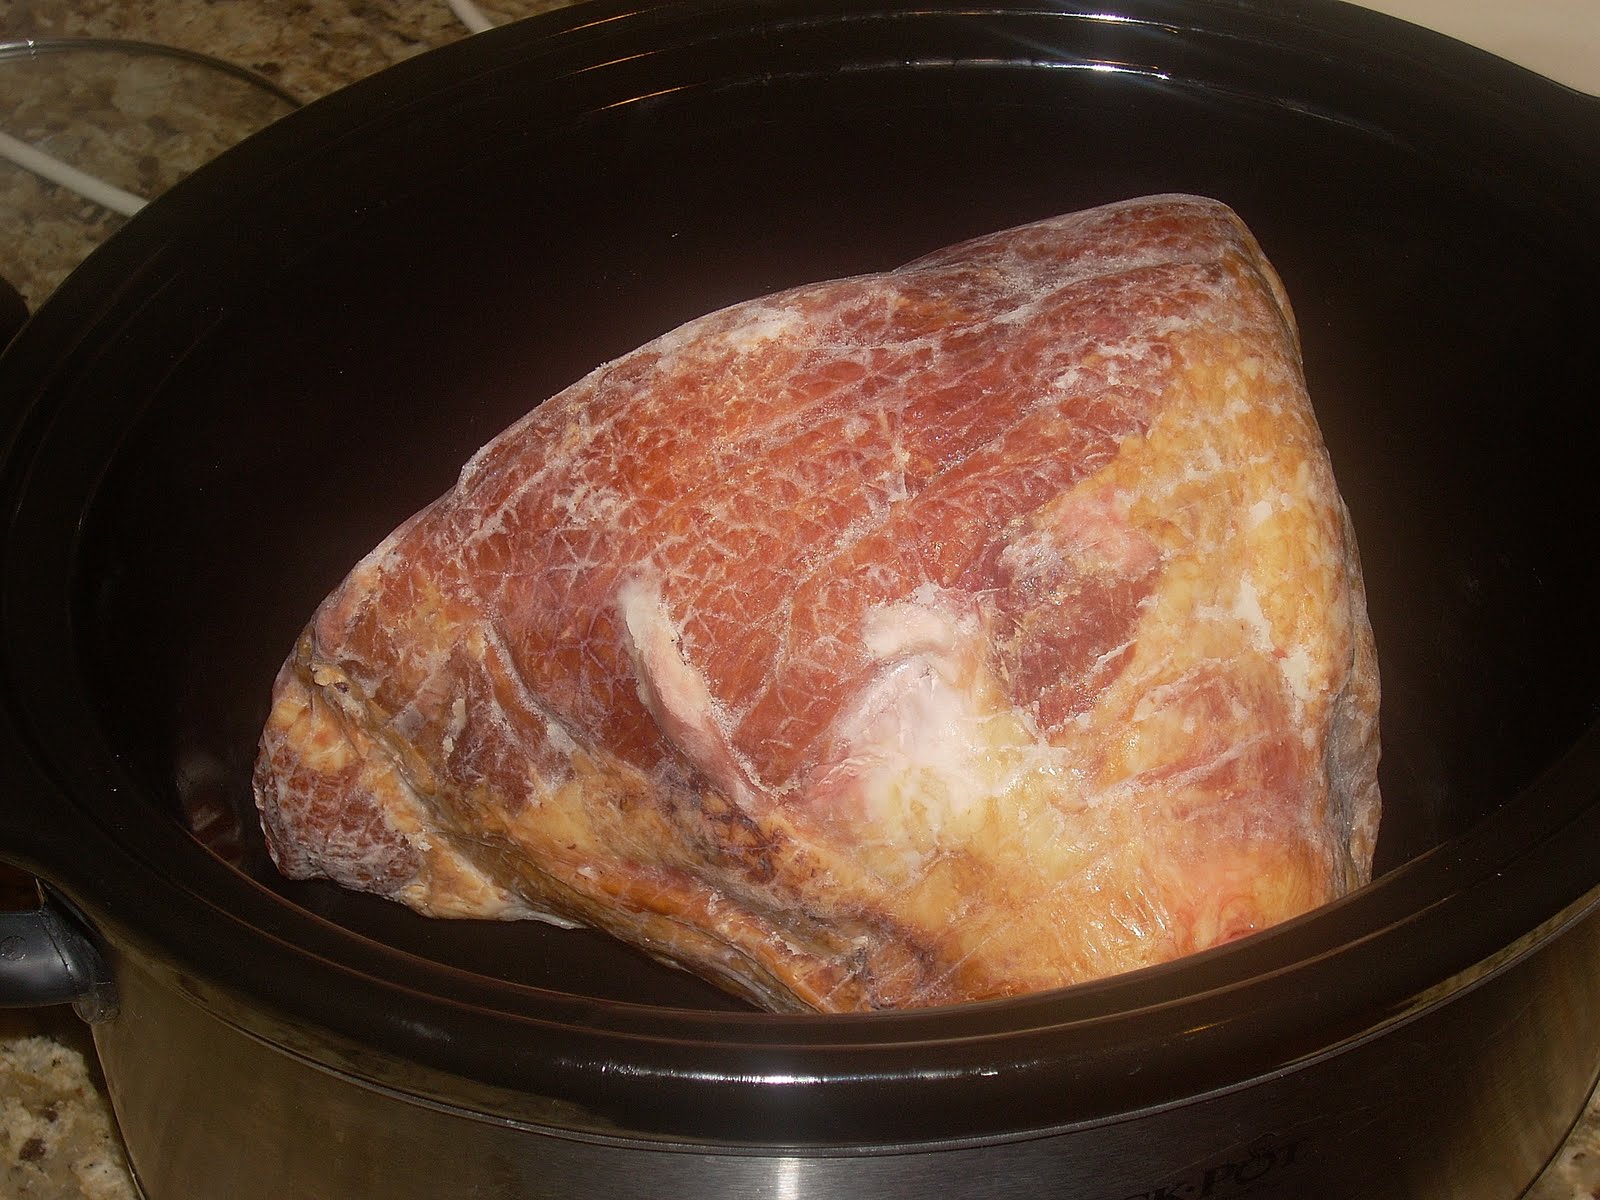
Look!! It's not frozen!
Okay, so that's only because I just bought it the night before and never put it in the freezer. But still, it counts.
Searing the meat in a hot pan in a little olive oil is optional, but the brown goodies in the bottom of the pan are good in the sauce. Put the roast in the crock pot and sprinkle with salt, or seasoned tenderizer, and pepper.
Deglaze the pan with the stock or water as soon as you take the roast out. If you used water, add a little (no more than 2-3  teaspoons) beef base and stir, scraping up all the little stuck on bits in the bottom of the pan. Add the tomato paste and stir it in a bit. I don't really know how much water I used. I just poured some from the kettle on the stove. When I stirred in the tomato paste it was a little thick so I added a bit more. Maybe 1 &1/2c. The consistancy was that of spaghetti sauce when I was finished, which brings us to the first of our alternatives. If you want to go the super easy route, you can just use your favorite spaghetti sauce for this. Pizza sauce will work too. You can also use red wine in place of the stock, but I didn't have any. I rarely do, so I've never actually tried this with the wine, but it'd probably be good. I know I like red wine in my venison with mushroom gravy. 
Pour the mixture from the pan on top of the roast and then add the diced tomatoes and carrots. You could most likely skip the tomatoes if you used a chunky spaghetti sauce.
Then add your onions and zucchini.
The other alternatives revolve around the veggies. I've done this before with nothing but onion, I've seen it done with cubed potatoes, diced celery, or with all of the above.
I didn't want potatoes (didn't need another starch for supper), I had just a little more shredded zucchini in the freezer, so I put that in (yes, it is still frozen), and I don't voluntarily put celery in anything but stock and chicken soup (even then it's in big chunks so I can easily pick it out). You could use fresh zucchini and dice it, but I love slipping shredded zucchini in on the kids every chance I get. They never know it's there. :D

If you used spaghetti or pizza sauce you may not need to add any additional italian seasoning. If you used the tomato paste and diced tomatoes, you probably will. Either way, I like to wait until closer to serving time to add any additional seasonings or herbs. That way I can taste the sauce and see what I think it may need before I go adding something. If you're unsure what to do, a teaspoon of italian seasoning is a pretty safe bet.

You can either leave the veggies in chunks or you can blend the sauce to a smooth consistancy. I never blended it 'til I had an immersion blender. I just didn't think it was worth the trouble of running a couple of batches of hot liquid in the blender - well, in truth, I just don't like cleaning the blender. The immersion blender is one of the absolute best kitchen gadgets ever. The results of a blender, the clean up of a whisk. At any rate, you can serve this over pasta or you can shred the meat and put in on a hoggie type roll. I really like rolls with the crusty outside. Delicious.


post signature

Wednesday, April 27, 2011

Baby gifts

I love making hooded baby towels as gifts. Sometimes I make a washcloth to go with it. Ri also enjoys working with me to make baby gifts. She's done bibs and washclothes. We usually make it a joint project so we can give a couple of things for the new baby.

This is a set we made for my cousin.
Ri did the cross stitch for the bib,
and for the washcloth.
I did this cross stitch and the sewing. The blue border stitching was done on the machine. I thought it needed a little something more to pull it all together.
This is one I just finished recently for some long-time friends.
These little elephants were just too cute.
Not wanting to border this in plain white bias tape, and being unable to fine any that had a pattern (not counting the expensive ones I found online), I decided to try my hand at making my own. You may be unable to tell from the picture, but the green has tiny dots on it, to match the polka dot umbrella. 
Ri made this bib for them.
She found the pattern for the boy and girl ducks, but they were just single patterns. Since she wanted to fill the space, she worked out the spacing for the repeat and then added the pull string. I think she did a great job.
One of the first projects I gave to my sewing class was a receiving blanket. This is one of the two I made as an example. I decide to add it in with the other two items. I'll keep the other for a future gift.

I have to admit that I really dislike the modern way of giving gifts for baby showers. You are told where the mother-to-be is registered, you go to the store, and you get a print out, often several pages long, which details exactly what the mom wants. There is absolutely no room for individuality from the giver. And trust me, I've seen some of the most ridiculous items listed on those things. It seems as though she walked through the store scanning every little thing that caught her eye, without really thinking about what would or wouldn't work, what might really be needed, or whether or not she would even get to use all of the twenty five dressy outfits she picked out in the 0-3mo. size before the baby grew out of them (she won't). It's a great way for the store to make money, but it's definately not the most practical for the parents, who will end up running out to the store 85 times during the first month in order to buy all the things they found out they really needed.

In protest, I decided several years ago to make baby gifts, unless it was for an expirenced mom whose list looks something like this: Diapers, wipes, tee-shirts, and more diapers. It gives them something special and keeps me out of Babies-R-Us, which is best for everyone. Just ask my kids - they've protested ever having to go with me again to shop from one of those registers. On the bright side, they did say that the last time it happened a young mother started following me around the store, taking things out of her buggy and putting in things that I was picking up. Maybe I helped convert one young, inexperienced mom. Don't ask me how this woman knew I disapproved of the choices she'd previously made. I never spoke to her and wouldn't have known what she had done if the kids didn't tell me while they were expressing the desire to never again set foot in the store. Suffice it to say, sometimes kids embarass their parents when they are out in public, and sometimes the shoe is on the other foot. Not that I intended to embarass them - I was just a triffle put out with the whole expirence; the list really was absurd. And for the record girls, I wasn't all that loud.
post signature

Monday, April 25, 2011

Sewing Room Organizaiton

I've put off saying anything so far, mostly because I disliked it so much, but Grandma was moved to a nursing home in March. It was at her request. Her dementia had gotten worse and she was very depressed. She knew she was forgetting things. Since her form of dementia caused sun-downing she was, for the most part, cognizant during the day, and it upset her a great deal. She felt she was a burden and we couldn't seem to convince her otherwise. My uncle made the arrangements and she is in the nursing home now, in a regular ward for the time being, awaiting being moved to their dementia ward as soon as everything can be arranged. I didn't like it a month ago, and I don't like it now, so that's all I'll say on the matter.

With another room available, hubby and I decided to bring Kay downstairs, to have a room of her own, and move Bree in with Ri, leaving the little girls in the room they had shared with Bree. Hubby also decided that it would be best to move the multipurpose room into the room Grandma had used since it was so much larger, giving Kay the smaller room which, although it's the smallest bedroom, is still plenty large enough for her queen sized bed, a bookcase, hope chest, bench and her end table.
It took us about a month to get everything moved around and organized, but part of that was because I let my father and his brothers take their time moving Grandma's things out. They already had all of her other furniture stored at their houses, so it took them a little time to find places for the rest of her belongings.
Kay got all of her things moved out from the room she shared with Ri and arranged to her liking pretty quickly, but I was much slower with the other room. I decided to go through EVERYTHING, right down to my stash of buttons, while going through the process of moving and reorganizing. Many things were culled, even some of our books. I also spent a good deal of time looking for affordable solutions for organizing a sewing room.
Here's what I ended up with.
All the sewing machines are down one wall. Here's mine.
Hubby gave me the tackle box on the shelf to put my buttons in.
Trust me, this cabinet is much neater now.
Most of my sewing and pattern books are on the bottom shelf.
The thread takes up the upper two shelves.
The bins on the door have been cleaned out too; holding my sewing needles, a variety of pencils, a small hot glue gun, a few spools of ribbon and a couple of cutting mats and grids, among other things. Some of the other small items are in the organizer on the base of the lamp on top of the table.
Next is the treadle machine with one of the other machines on top, and Ri's table and machine are on the end.  I just put up her shelf so she's not finished organizing her table yet. There was a little mishap with hanging the shelf that necessitated the lag time required to spackle and paint a small section of the wall. Hey, I said it was a small section (actually two small sections), and I never claimed to be good with a hammer.
One of the baskets holds yarn and knitting needles and the two plastic ones hold quilt fabric that needs to be cut out and sewing projects that have already been cut out and are waiting their turn. Ri's see-through trash can just has to squeeze in the best way it can. All of those baskets have to move when Bree sews, but that doesn't happen on a regular basis yet.
This is the best place I could find for the ironing board right now.
The door to the room stays open and the closet door is usually closed, so it doesn't cause much of a problem. An outlet on the short wall behind the door keeps us from having an extension cord run across the room.

One of the organizational tips I ran across on the internet suggested this method of storing fabric. It works great. When I ran out of pants hangers from the dry cleaners, I went and bought the plastic ones at a discount store.
The longer pieces of fabric are on the right and the shorter ones are one the left.
That was so I could put this file cabinet and organizer drawer under the shorter ones.
The drawer holds lining fabric (since it's slick and would slide off the hangers) and interfacing.
Some of my patterns are in the file cabinet. This is also where Beenie keeps her guitar case.
The other side has a variety of stuff - my knitting bag, some more patterns and boxes of fabric scraps.
The rest of my ribbons, threaded on a wire hanger.
As you can see, we stacked the cabinets that used to hold fabric.
The top is mine. Embroidery supplies, lace, elastic, and other sewing notions share space with DVDs, greeting cards, evelopes, return lables, other officey (yep, that's a word) stuff, and my bibles - yes, I know there's only one there now. I took the other to church yesterday and it hasn't made it back here yet. I did get it out of the car this morning. :D  
The bottom is for the kids. Puzzles, coloring books, crayons, a few books and some school stuff.
The rest of that wall holds the computer, printer, and the other bookcase.
Don't your library books sit on the floor in a reuseable grocery bag, adorned with a frog?
And last, but not least, a table. I originally had the smaller folding table in here, but hubby nixed that and decided the larger table would work better and we would still be able to move around in the room without a problem. He was right. There's more room around the table than there appears to be in this photo.
I love having this table in here. I can cut out fabric without having to haul everything in to the kitchen table. I can lay things out and not have to move them if it's supper time. We actually have enough room to do school, and don't have to move that stuff for lunch if they aren't finished. It's just great.

I didn't really do much with the computer or printer table, but there wasn't much that could be done different with them. I do like the way I have the sewing things arranged now. I've been trying to catch up on some of my stuff. I'll do a post in a couple of days on some more of the things I've been sewing.
post signature

Saturday, April 23, 2011

Family time this weekend.

Sorry, no post on slow cooking today.

We've spent the day picking people up, dropping them off, spending time with family and friends, and oh yea, eating. Not necessarily in that order.

I'll post another crock pot meal next Saturday.

Have a wonderful day tomorrow, praising the resurrection of our Lord and Savior, Jesus Christ.
post signature

Tuesday, April 19, 2011

"We're the product of public schoolers gone rogue."

How could you not laugh at such a description?

"If we turned out so well, just imagine how much smarter our kids will be."

These statements were made by Ri in objection to criticism about the adequacy of former homeschoolers with regard to teaching any children they may have. It seems there are some who have voiced the opinion that the only reason we, as homeschool parents, have been able to successfully teach our children is because, by and large, we received our own educations through the public school system.

Hogwash.

The only people asinine enough to make such a statement are those who've never homeschooled.

I can certainly attest to the fact that absolutely nothing in my public school education prepared me for homeschooling. Not any part of it. Not the actual subjects (you can't imagine how much I had to re-learn, or learn for the first time). Not how to approach teaching. Not about the different ways children learn and the best method of teaching to that way of learning. And certainly nothing about how to teach the older kid(s), keep up with the toddler(s), stay on top of the laundry, feed everyone (at least) three times a day, find time to do all the shopping, bill paying and other errands, all while having to stop every 2-3 hours to nurse the baby. Nope, not one subject on that. Not even part of one. Not even a hint of any of it in the child development course I took as an elective in high school.

At the very least, my girls will be better prepared for the day to day workings of a homeschool family, and for me, learning to manage it all was more than half the battle. They have already experienced needing to work school in around nap time. They understand the necessity of multiple 10 min. tidy times during the course of the day in order to stay on top of the chaos. They know how to do school with a baby sitting on the table, and that clothes must be washed everyday if you want to keep the mountain of laundry reasonably tame. They've sat through unit studies that taught everyone, kindergartener to high school level, and negotiated grocery stores with three carts full of kids and food, all the while keeping little hands away from the calculator because we can't go over budget. And they completely comprehend the pricelessness of the buddy system - pairing up older kids with younger ones in order to get things accomplished within a reasonable time frame. As far as all that goes, they are also better prepared for teaching because they've already had expirence teaching. I've often asked the older girls to teach something to the younger girls. It helps me evaluate the older child's comprehension of the subject, as well as their ability to effectively communicate information. They've given tests, and in some cases, have even been allowed to plan the curriculum for a subject.

No-one, except maybe those with photographic memories, remembers everything they are taught. I didn't, and I'm sure my children won't, but I hope I've instilled in them the skills and initiative necessary to teach their own children.
post signature

Saturday, April 16, 2011

Crockpot Cooking: Ham

Okay, so maybe I lied when I said barbeque chicken and ribs were the easiest thing to make in a crock pot. I completely forgot how easy ham could be. It isn't always, but it can be.

Baked Ham

Ham - whatever type you prefer; raw, pre-cooked, spiral sliced, whatever's on sale - this is my prime consideration, but you can do whatever you want.
Optional ingredients:
Brown sugar               Pineapple
Ground cloves            Rasins

Put your ham in the crock pot. As usual, mine wasn't thawed.
The biggest consideration here is whether or not your ham is small enough to fit in the pot you have. Mine would have fit better if it had been thawed, but there are ways to work around that.
At this point, if you want super easy, you just cover it, turn it on and walk away. But if you want to jazz it up a little you can make your own glaze for it, because you don't want to use the nasty, no-one-can-prounounce-half-the-ingredients package of pre-made glaze it came with, now do you?

So here are the glaze instructions: Mix together some brown sugar(about a cup or so?), a couple sprinkles of ground cloves, the juice from a can of pineapple rings, and a handful or two of raisins in a small pot and heat on medium until the sugar melts. Put the pineapple rings on the ham, pour on the glaze, sprinkle with a bit more brown sugar and cloves (if desired), and then cover and cook. You may need to baste the ham a time or two before serving. I wouldn't do this if the ham was going to cook most of the day because the sugar would burn on the sides of the pot, but you could do it a little before serving time, or if your ham only needed to cook a few hours. As much as I love this (my mom used to do ham this way) I don't do it very often because hubby doesn't like glazes on ham.

If your ham doesn't quite fit you can cover it with aluminum foil, making sure the edges don't hang over the sides of the pot. Mine will fit once it's thawed, but this will get it started.
Then put the lid on the best you can and turn it on. Unless your ham was way too big and the lid doesn't go on at all, it will cook just fine. If your ham is way too big, you can cover it with multiple layers of foil, crimping the edges down as tightly as you can around the top of the pot.
post signature

Thursday, April 14, 2011

Aprons, among other things.

I've been trying to get some of my sewing projects done, but as with most other stuff, it's gets pieced in as I find the time. I have completed both of T.Lynn's aprons and her shoulder bag.
Froggies. Typical T.Lynn.
She wanted to show off the "all the way through" kangaroo pocket.
And the bow.
She was wearing her bug/lizzard/frog embroidered skirt too.
This is a pinafore style apron. T. loved the pink polka dot/cherry print fabric.
I paired it with some of the red polka dot fabric that was left after making her dress last year.
She wanted to show off the lined pocket. She likes the fact that she has "the pretty
cherry fabric", instead of the backside of the red polka dot fabric. She's all about details.
It wouldn't be complete without a picture of the bow.
Next was her shoulder bag. It's a smaller version of one I made for myself (not in the cherry fabric).
Pardon the monkey pyjamas. I finished it right about the time she was going to bed.
She loved the ladybugs on this ribbon I found in the discount bin at the hobby store.
I assured her it would look fine since the background is pink with white polka dots.
And last, but not least, she wanted to show the big red button at the top.
It matches the button at the top of her pinafore.

I have also done a bit more work on Beenie's quilt and started cutting out the yellow wedges that will form the sunflowers on Ri's quilt. I did complete a skirt that should have been for Beenie, but it ended up for T. because I misunderstood which of Ri's patterns it was that I was supposed to use. Oh well, things happen.
post signature

Saturday, April 9, 2011

Crockpot Cooking: Macaroni and Cheese

Sometimes it almost seems as though the ladies at church all get together and plan what we're going to have on our potluck Sunday. One month during the winter nearly all of us brought some kind of soup. Last month, or maybe it was the month before, spaghetti was on the menu (for my part, I brought my crock pot lasagna, but it's in the same family). Last Sunday was apparently macaroni and cheese day. There were four or five crock pots of mac and cheese. They were all a bit different. One of the ladies added ham to hers. Although I asked the kids if they wanted me to add ground beef to ours, the resounding response was, "No!! Can we have it with bacon? Pleeeeeease?!?!?!?!" So, despite how I made it this time, you can jazz it up anyway you want. Bacon (a real crowd pleaser), ham, ground beef, grilled chicken, or you can try to make it a little healthier and add some broccoli florets. That wouldn't go over real big around here, but your family may like it.

Macaroni and Cheese

Macaroni noodles                     Butter
Cheeses of your choice             Flour
Milk                                         Cream cheese
Salt                                          Pepper
Ground mustard                       Add-ins (optional)

Boil your noodles and grate the cheese. I grated some of mine, and some was pre-shredded. Like with the lasagna, don't boil the noodles the full 10 min. I think I cooked these about 8 - at least that's what I set the timer for, but I 'think' I may not have taken them off immediately. Run cold water over them in the colander just as soon as you dump them in; you want to stop the cooking process quickly. Pour the cold noodles in the crock pot and mix in about half of your cheese. In this case it was about a half pound each of mild and sharp cheddar, but I didn't really measure the sharp (the pre-shredded), and this was a large batch, filling my 7qt. pot.
Go ahead and pre-cut your cream cheese as well. You don't want your sauce to scorch while you do this later. I think I used about 3/4 of the package - approx. 6 ounces.
For a really creamy mac and cheese, we'll be making a kind of Mornay sauce. Ah-ha - French cooking 101. You didn't know I had it in me, did you? Well I don't, not really, but we'll pretend I do for this. Mornay sauce is a Bechamel (see? more French) sauce with cheese. Traditionally, they have white cheeses in them; Gruyere, parmesan, white cheddar, you get the picture. If you like those, go ahead and try. Ours will have cream cheese, motzerella, and cheddar. Bechamel is white sauce, or in Southern-girl talk, white gravy. French cooks would probably have a fit to hear it called that, but that's pretty much what it is; white gravy that is made with butter instead of the fat left in the pan when you fry meat. So, the first thing you need to do is make a rue, or since we're flinging around French terms here today, roux. Melt butter and add in your flour. In the photo above you can see mine simmering nicely. It was almost finished when I took the picture. You want to do this over med-low heat because you want to cook the roux, but you do not want to brown it - at all, you really don't. You can go ahead and add your salt, pepper (white pepper if you want a true Bechamel - but I like seeing those pepper flakes), and ground mustard just before adding the milk. If you wait to add the ground mustard after adding the milk it may form little clumps (yuck), so do it now.
Then, add your milk, whisking while you pour it in. You need to add at least half of what you'll end up needing right at the start or you may gets clumps, but since you probably won't make as much as I do, I can't really give you any measurements. If you don't add enough, vigorous whisking can correct the problem, especially if you pour more milk in as soon as you see the roux quickly soaking up all the milk and forming one big mass in the pan. I had a half pound of butter (1c.) and a heaping cup of flour in my dutch oven, so I added enough milk to come halfway up the side of the pan right at the start. I had to add more later, but that got me started without clumps.
For this, you're looking for a consistancy that will allow the sauce to "trace". Just like in soap making, it will hold up enough to see where you just poured it. See my squiggly line? Then you add in your cream cheese, cooking for a minute or two until it's nearly melted.
After that you start adding your other cheeses. Motzerella. All yummy-gooey cheese dishes should have motzerella in them. It melts so beautifully. I have no idea how much I added. I just dumped in what was left in the bag. I know ya'll appreciate my precision.
Cheddar - mild in this case. This was the other half of the pound I shredded earlier. See? I can measure. Sort of. Whisk in between the different cheeses. No science behind it. It will just make your life easier.
Lastly we'll throw in any of those add-ins you may want. Bacon this time - purely for the kids. You know it was. Stir it well and then pour it in your crockpot with your noodles and cheese. Trust me, you'll want to pour it in batches, stirring between pourings. Having a large, reasonably flat spoon (or maybe a very small oar) really helps when you're making a large batch.
Excuse the color on this. You knew I was the photographer didn't you? I did the best I could with it in editing. At least you get the general idea of what it should look like. You'll probably want to clean off the excess sauce around the top so it doesn't burn during cooking.
Then, as if 2+ pounds of cheese isn't enough, top the whole thing with a layer of cheese. Finely shredded sharp for this round. This was put in the fridge Saturday night and then put it back in the base and turned it on high for about an hour before we left for church. Once we got there we left it on high until the service was over and the serving table set up. Approximately another 2 hours. If you need to cook it longer, just turn it on low.

I usually make this the night we'll eat it, pouring it into a large (10"x15") casserole dish. When I do it that way I don't add the final layer of cheese until it's nearly done because it tends to sink to the bottom, or run to the middle. It doesn't do that in the crock pot unless your sauce is very thin. Just cook it 'til it's bubbly, pull it out and top it with cheese, and finish up just long enough to melt the cheese on top.

As T.Lynn says - Nummy!
post signature